It could be a battery or a charger problem.
Get a different battery/charger. I recommend borrowing your friends, so you don't have to spend money, And, if you determine it is one, you didn't have to buy the other to find that out!
If that doesn't work, try cleaning all of the contact surfaces on the DS Lite (Where the charger plugs in, the metal that touches the battery)
If you fix it with one of these methods, then that is all there is to it.
If none of these help,
If the DS is under warranty then take it back why waste time, Or Try calling Nintendo's support hotline, use their online support:http://www.nintendo.com/consumer/Online support may not have the answer to what you need, in which case it will lead you to a webform E-Mail service to get personal help.
If your DS Lite is over 1 year old, and it needs to be repaired, you will have to pay £50-£80 to get it repaired. But Here are the steps:
Alright the first thing you are going to need to do is determine you have a DS with a blown fuse. Try to turn on your DS. If the light goes on for a second, and then turns itself off, there’s a good chance that this is your problem, and this method will provide a fix. If not, then you may want to try it anyway. It’s not like you have anything to lose…
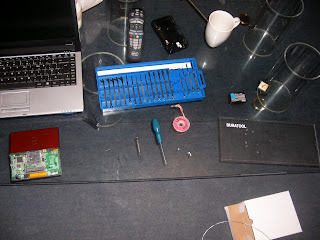
1. Tools you need :

Soldering Iron (Low wattage)
Very thin wire (Gauge 10 or 22)
set of Very small Screw drivers (0.9mm and 1.2mm)
cup of tea..
2. Take 8 of the screws out : 2x under the battery, 2x under the black feet, 3x near each corner, 1x under slot 1.

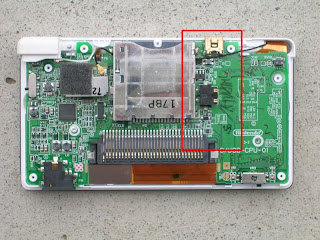
3. After you have the DS disassembled, you’ll have something that looks like this. The section in the red square is the section we’ll be dealing with:


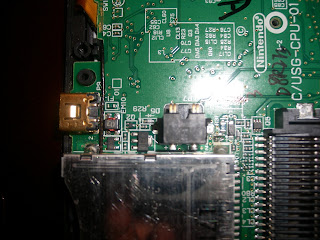
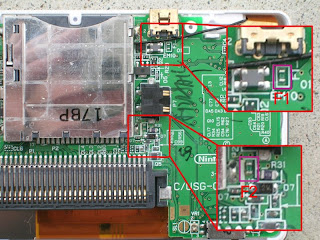
4. Take a look at the mainboard find the F1 and F2 Fuses. These are the ones that are causing the problem. We will take a look at F2 first, and then if needed F1
Take your soldering iron and heat it up. When heated, carefully desolder F2. Do this by putting the tip of your iron on one end of the fuse and heating it up. Gently pry upwards on the fuse until it comes loose. Then do the same on the other side. or attach your gauge wire to both ends of the fuse.. There’s such a minuscule amount of solder on the board that you will only need to hold the iron to the board for a couple of seconds to get it loose. This is good; the less heat applied to the DS’s board.Once you’ve gotten rid of the F2 Fuse, clip a little piece of wire just big enough to bridge the two contacts left behind from where the fuse was. It might take a bit of maneuvering to get it there because it’s so small. Once you get it in place, apply some heat with your iron and solder it to the two contacts. Before you start messing with F1, put your battery in and test it. If it turns on, great! You’re done. Close it back up and you’re good to go! If it still doesn’t work, move on to the F1 Fuse and repeat the process again for that one. Close your DS back up and you’re good to go!. The F1 and F2 fuses will be on different places on the board however, so you will have to do a little bit of searching to find them. Just do the same process as above once you’ve found the fuses. if you want to replace the fuses :
get them here:
http://cgi.ebay.co.uk/ws/eBayISAPI.dll?ViewItem&ssPageName=STRK:MESELX:IT&item=150296374809
More reading:
http://m3wiki.com/index.php/Nintendo_DS_Lite_:_Repair_a_broken_console_(blown_fuse)
Video : (not by me!!)
No comments:
Post a Comment