Well we all use backup devices ! Don't we?
NOW there is a new device that I think will save time..
Rebit is an external USB hard drive. Unlike other external solutions, which can be used as “just a hard drive”, the Rebit isn’t designed, nor will it let you, use it as basic external storage.
Instead, it’s designed to provide complete, real-time, continuous backups (more like synchronizations) of everything (and I do mean EVERYTHING) on your PC’s internal drives only. Now I don’ t have any inside information, but I think I have a good idea how it works - and my guess is that involves things like Windows Change Journals VSS and other ways that the average user probably never has heard of, and certainly doesn’t want to concern themselves with. But that’s the beauty of Rebit. It does some pretty complicated things to make sure it always has the most up to date copy of any given file on your computer, and it does it all with you barely even knowing it’s there.
Installing & Configuring Rebit
To get Rebit up and running all you need to do is plug it in to your PC via USB. Because its innards are comprised of a laptop-sized hard drive, it doesn’t require an external power source. In most cases, a single USB port is sufficient to power the device. If your computer can’t provide enough juice over one port, the Rebit’s USB cable has a second plug which you can use for additional USB power.
As soon as you plug in the Rebit you’ll be prompted to “Start” Rebit. You’ll need to click OK to the license agreement as well. After that you can pretty much forget Rebit exists. It will do everything it needs to do, and it won’t need any additional help from you.
It’s worth mentioning that Rebit will install a couple of service on your PC. It will also kick off a couple of additional processes when you login to Windows. It sounds like a lot, but I found Rebit’s resource footprint to be practically non-existent; certainly far less than any backup solution I’ve seen to date
Restoring with Rebit
Easy Just use Explorer and drag your files out.. if you completely screwed your PC OR Need everything onto a new one, ITS easy as A.B.C - Insert the Rebit recovery CD and boot, restore the whole Image back. DONE..
The Versions its available in are 160Gb, 320Gb and 500Gb. There will be a version for SBS and Network Environments. REMEMBER is currently for a single computer.
Get the PDF
More updates will be added as I figure them out.
Sunday, December 21, 2008


Friday, December 12, 2008
Copy IPod Music from 1 Pc to 2nd PC
Well Don't invest in software when you can do in manually - But hay if you can't copy and paste then may be you should pay!!
I'm like to thank Chris for testing this out and lending me his Ipod.
Apple does not ant to make it easy for you so it encrpts the names of all your music on your ipod and mixes up all you albums.
Do the folowing:
1. Plug your ipod into a computer with itunes installed.
2. When it is detected by your computer you will see it as a hard-drive under My Computer
3. Right click on the icon & click open
4. You now have to make all folders visible -> Tools -> Folder Options -> View -> Show hidden files & folders
5. Once you have selected to allow hidden folders to be visible, you will now see a folder called Ipod_Control, open this. Here you can see all your music you have stored on your ipod except as I said at the begining the names of each track is renamed to something like XYGB. Also each folder may contain 12 different tracks but these tracks are no longer the same album but a mixture of all your tracks from all your albums....................this makes it impossible to know what songs or albums you are looking at.
6. if you double click on each track (XYGB for example) it will be automatically opened in itunes, & itunes will then decode the encryption and give you back the track name along with album and artist as usual in itunesIn conclusion, you can pain stakingly double click all the tracks (or likewise import them through itunes) and you will get back all your music from your ipod into your PC WITH all the music attributes but where they are stored on your PC will always remain encripted and mixed up......but who cares about that as long as they are organised in itunes, which they will be. This will take a while.
Thats All, If you get a chance you can always put your ipod into a cracker.. :-)
On a serious note DUMP Itunes and get http://www.mgtek.com/dopisp/
That's right, kiss iTunes goodbye and start syncing your iPod with Windows Media Player! Finally, there is a solution that is fully integrated into Windows Media Player.
Some more info:
http://www.itreviews.co.uk/software/s479.htm
I don't think this is the only software that does its job and DUMP Itunes.. If use anyothers please let me know.
I'm like to thank Chris for testing this out and lending me his Ipod.
Apple does not ant to make it easy for you so it encrpts the names of all your music on your ipod and mixes up all you albums.
Do the folowing:
1. Plug your ipod into a computer with itunes installed.
2. When it is detected by your computer you will see it as a hard-drive under My Computer
3. Right click on the icon & click open
4. You now have to make all folders visible -> Tools -> Folder Options -> View -> Show hidden files & folders
5. Once you have selected to allow hidden folders to be visible, you will now see a folder called Ipod_Control, open this. Here you can see all your music you have stored on your ipod except as I said at the begining the names of each track is renamed to something like XYGB. Also each folder may contain 12 different tracks but these tracks are no longer the same album but a mixture of all your tracks from all your albums....................this makes it impossible to know what songs or albums you are looking at.
6. if you double click on each track (XYGB for example) it will be automatically opened in itunes, & itunes will then decode the encryption and give you back the track name along with album and artist as usual in itunesIn conclusion, you can pain stakingly double click all the tracks (or likewise import them through itunes) and you will get back all your music from your ipod into your PC WITH all the music attributes but where they are stored on your PC will always remain encripted and mixed up......but who cares about that as long as they are organised in itunes, which they will be. This will take a while.
Thats All, If you get a chance you can always put your ipod into a cracker.. :-)
On a serious note DUMP Itunes and get http://www.mgtek.com/dopisp/
That's right, kiss iTunes goodbye and start syncing your iPod with Windows Media Player! Finally, there is a solution that is fully integrated into Windows Media Player.
Some more info:
http://www.itreviews.co.uk/software/s479.htm
I don't think this is the only software that does its job and DUMP Itunes.. If use anyothers please let me know.
Wednesday, December 3, 2008
Fix your Nintendo DS Light
At first, my daughters Nintendo DS Lite won't turn on, Light Flashes then goes out. When it did turn on - after about 20 seconds in to the game it freezes and you had to turn off the game to restart. Now it won't turn on at all. You turn on the switch and the green light comes on but nothing else does. What should I do? DON'T PANIC..
It could be a battery or a charger problem.
Get a different battery/charger. I recommend borrowing your friends, so you don't have to spend money, And, if you determine it is one, you didn't have to buy the other to find that out!
If that doesn't work, try cleaning all of the contact surfaces on the DS Lite (Where the charger plugs in, the metal that touches the battery)
If you fix it with one of these methods, then that is all there is to it.
If none of these help,
If the DS is under warranty then take it back why waste time, Or Try calling Nintendo's support hotline, use their online support:http://www.nintendo.com/consumer/Online support may not have the answer to what you need, in which case it will lead you to a webform E-Mail service to get personal help.
If your DS Lite is over 1 year old, and it needs to be repaired, you will have to pay £50-£80 to get it repaired. But Here are the steps:
Alright the first thing you are going to need to do is determine you have a DS with a blown fuse. Try to turn on your DS. If the light goes on for a second, and then turns itself off, there’s a good chance that this is your problem, and this method will provide a fix. If not, then you may want to try it anyway. It’s not like you have anything to lose…
1. Tools you need :
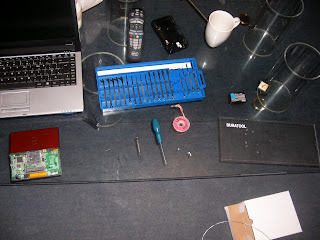
Soldering Iron (Low wattage)
Very thin wire (Gauge 10 or 22)
set of Very small Screw drivers (0.9mm and 1.2mm)
cup of tea..
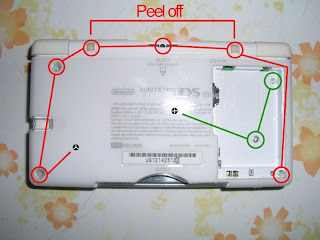
2. Take 8 of the screws out : 2x under the battery, 2x under the black feet, 3x near each corner, 1x under slot 1.
3. After you have the DS disassembled, you’ll have something that looks like this. The section in the red square is the section we’ll be dealing with:
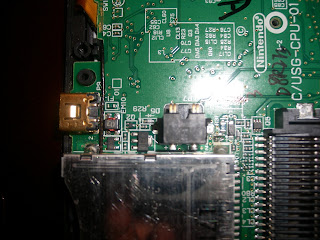
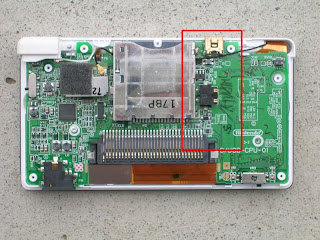
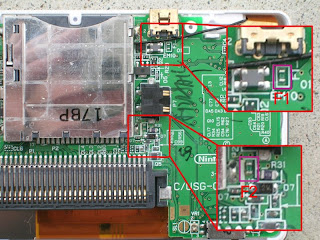
4. Take a look at the mainboard find the F1 and F2 Fuses. These are the ones that are causing the problem. We will take a look at F2 first, and then if needed F1
Take your soldering iron and heat it up. When heated, carefully desolder F2. Do this by putting the tip of your iron on one end of the fuse and heating it up. Gently pry upwards on the fuse until it comes loose. Then do the same on the other side. or attach your gauge wire to both ends of the fuse.. There’s such a minuscule amount of solder on the board that you will only need to hold the iron to the board for a couple of seconds to get it loose. This is good; the less heat applied to the DS’s board.Once you’ve gotten rid of the F2 Fuse, clip a little piece of wire just big enough to bridge the two contacts left behind from where the fuse was. It might take a bit of maneuvering to get it there because it’s so small. Once you get it in place, apply some heat with your iron and solder it to the two contacts. Before you start messing with F1, put your battery in and test it. If it turns on, great! You’re done. Close it back up and you’re good to go! If it still doesn’t work, move on to the F1 Fuse and repeat the process again for that one. Close your DS back up and you’re good to go!. The F1 and F2 fuses will be on different places on the board however, so you will have to do a little bit of searching to find them. Just do the same process as above once you’ve found the fuses. if you want to replace the fuses :
get them here:
http://cgi.ebay.co.uk/ws/eBayISAPI.dll?ViewItem&ssPageName=STRK:MESELX:IT&item=150296374809
More reading:
http://m3wiki.com/index.php/Nintendo_DS_Lite_:_Repair_a_broken_console_(blown_fuse)
Video : (not by me!!)
It could be a battery or a charger problem.
Get a different battery/charger. I recommend borrowing your friends, so you don't have to spend money, And, if you determine it is one, you didn't have to buy the other to find that out!
If that doesn't work, try cleaning all of the contact surfaces on the DS Lite (Where the charger plugs in, the metal that touches the battery)
If you fix it with one of these methods, then that is all there is to it.
If none of these help,
If the DS is under warranty then take it back why waste time, Or Try calling Nintendo's support hotline, use their online support:http://www.nintendo.com/consumer/Online support may not have the answer to what you need, in which case it will lead you to a webform E-Mail service to get personal help.
If your DS Lite is over 1 year old, and it needs to be repaired, you will have to pay £50-£80 to get it repaired. But Here are the steps:
Alright the first thing you are going to need to do is determine you have a DS with a blown fuse. Try to turn on your DS. If the light goes on for a second, and then turns itself off, there’s a good chance that this is your problem, and this method will provide a fix. If not, then you may want to try it anyway. It’s not like you have anything to lose…
1. Tools you need :

Soldering Iron (Low wattage)
Very thin wire (Gauge 10 or 22)
set of Very small Screw drivers (0.9mm and 1.2mm)
cup of tea..
2. Take 8 of the screws out : 2x under the battery, 2x under the black feet, 3x near each corner, 1x under slot 1.

3. After you have the DS disassembled, you’ll have something that looks like this. The section in the red square is the section we’ll be dealing with:


4. Take a look at the mainboard find the F1 and F2 Fuses. These are the ones that are causing the problem. We will take a look at F2 first, and then if needed F1
Take your soldering iron and heat it up. When heated, carefully desolder F2. Do this by putting the tip of your iron on one end of the fuse and heating it up. Gently pry upwards on the fuse until it comes loose. Then do the same on the other side. or attach your gauge wire to both ends of the fuse.. There’s such a minuscule amount of solder on the board that you will only need to hold the iron to the board for a couple of seconds to get it loose. This is good; the less heat applied to the DS’s board.Once you’ve gotten rid of the F2 Fuse, clip a little piece of wire just big enough to bridge the two contacts left behind from where the fuse was. It might take a bit of maneuvering to get it there because it’s so small. Once you get it in place, apply some heat with your iron and solder it to the two contacts. Before you start messing with F1, put your battery in and test it. If it turns on, great! You’re done. Close it back up and you’re good to go! If it still doesn’t work, move on to the F1 Fuse and repeat the process again for that one. Close your DS back up and you’re good to go!. The F1 and F2 fuses will be on different places on the board however, so you will have to do a little bit of searching to find them. Just do the same process as above once you’ve found the fuses. if you want to replace the fuses :
get them here:
http://cgi.ebay.co.uk/ws/eBayISAPI.dll?ViewItem&ssPageName=STRK:MESELX:IT&item=150296374809
More reading:
http://m3wiki.com/index.php/Nintendo_DS_Lite_:_Repair_a_broken_console_(blown_fuse)
Video : (not by me!!)
Subscribe to:
Posts (Atom)